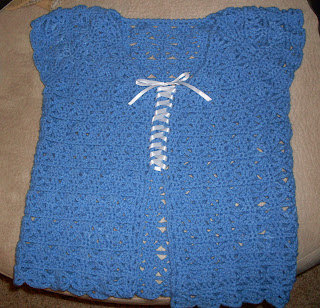
Yay! Christmas is almost here. I love Christmas. I love the food, the music, the wrapping paper, watching my niece open presents, everything. Well, not everything. I hate the traveling. Why can't my whole family just move to my town?! It would be so much more convenient. I also hate the way I never get the things done that I set out to do. I'm in the middle of 7 or 8 different projects that all have the same deadline looming over me. And I don't really want to work on any of them.
I did get one done today though. This was a special order through Etsy. I love the way it turned out and hopefully she will too. It is an original pattern based loosely on another sweater I did a couple of years ago. I think the color she selected looks beautiful.
I also finished a sweater for me a few weeks ago. I am pleased with how it turned out too. The pattern is from Interweave Crochet Spring 2010. It's called New Town Swing Sweater. I get tons of compliments everytime I wear it and I wear it a lot!
Sunday, December 11, 2011
Friday, August 19, 2011
Oh My Gosh! I have to work for a living!
I started back to work today. So much new stuff to learn. I think it is going to be a good year though. The school I am working for has great administration and everyone seems to be pretty positive about this year. Now that I am working again after having the whole summer off, it is going to be harder to find time to crochet and knit. Oh well, I guess that means my time will be more precious and I'll have to choose patterns that mean more to me!
I just finished this beautiful baby blanket. I seem to have a hard time keeping boys blankets on hand. I really like this pattern. I kind of took parts from a pattern on Lionbrand.com then changed it up and added a different border. I like the twisted border that incorporates both colors of the blanket.
I was thinking about trying some lace shawls. They seem to be gaining popularity and might be a good transition back to more wintery items. Plus I haven't done lace in awhile and I kind of miss the complexity.
Thursday, August 18, 2011
I Take on the "5-hour Baby Sweater" on Ravelry
I have a new favorite pattern - The 5-hour baby sweater. It is very cute, simple, and gender neutral. I have tried it in variety of mohair blend yarns and a couple of acrylics. I also added a hood to one and gave it bear ears. Now I have turned it from a cardigan style into a pullover. So versatile! Here are some pics.
Saturday, July 23, 2011
No Farmers' Market for Me :(
Okay, so I got up early this morning after getting practically no sleep thanks to Chris's snoring and just plain being up too late. I spent hours yesterday making sure everything was ready updated my tags to include the sizes on things. Got over to the Farmers' Market and stood in line...and didn't get called in their lottery. I could have slept in. I'm frustrated because I was really hoping to do it this weekend. I have been so busy with moving and craziness that this is kind of my first chance since June. I was in Helena in June and that was fun so I thought I might try Missoula since this is where I am right now. But no, I have no luck in lotteries. I will probably try again next weekend. After that I will be up in Columbia Falls or Kalispell. I've heard they are both good.
Just in case anyone else has ever had this experience...It is not easy to type on a laptop with a cat laying across both arms. Isn't she adorable though?
Sunday, June 12, 2011
Crochet ruffled baby set
I love to make sets for babies. I remember when I was little and I loved a matched set. It made me feel all dressed up. This little set including the ruffled shirt and hat is so cute and I love the ruffles. Blue, but very girly still.
Recently I have been continuing in my hat compulsion. I have made several more baby hats and a couple adult hats and children sized. My current favorite is my spiral crocheted hat in yellow, blue, and pink. It was kind of a nusance to do with the stopping and starting again but the overall effect is cute. I love the edging. Kind of a signature thing I do sometimes. The ruffled chain twists around so that all the colors are incorporated and no one color is dominant.
Saturday, May 28, 2011
Crochet Cloche - Back by popular demand!
Due to several requests, I have written down the pattern for my cloche hats. The gauge will vary a little but I found using several yarns all about a worsted weight and the results are pretty consistent. I have also written the patten to include a size for adults small-medium size in parenthesis.
Crochet cloche
toddler size ~16“ circumference (adult ~21“)
Yarn – any worsted weight
Hook – size I
Chain 4, ss in first chain to form loop (or use magic loop)
Round 1: ch 3 (counts as first dc here and throughout) 9 dc in loop, ss to join (10 dc)
R2: ch 3, 1 dc in same stitch, 2 dc in each dc around, ss to join (20 dc)
R3: ch 3, (2 dc in next stitch, 1 dc in next stitch) to last dc, 2 dc in last st, ss to join (30 dc)
R4: ch 3, dc in next dc, 2 dc in next dc, (dc in each of next 2 dc, 2 dc in next dc) around, ss to join (40 dc)
R5: ch 3, dc in each of next 2 dc, 2 dc in next dc, (dc in each of next 3 dc, 2 dc in next dc) around, ss to join. (50 dc)
Adult size only R6: ch 3, dc in each of next 3 dc, 2 dc in next dc, (dc in each of next 4 dc, 2 dc in next dc) around, ss to join (60 dc)
R6-8 (7-10): ch 3, dc in each dc around, ss to join. (50 dc (60 dc))
R9 (11): ch 4, skip next dc, (dc in next dc, ch 1, skip next dc) around, ss to join. (25 dc and 25 ch1 spaces (30 dc and 30 spaces))
Toddler size only R10: ch 3, 2 dc in first ch 1 space, (dc in next dc, dc in next ch 1 space) to halfway point of round, 2 dc in next dc (dc in next ch 1 space, dc in next dc) to last ch 1 space, dc in last ch 1 space, ss to join. (52 dc)
Adult size only R12: ch 3, dc in first ch 1 space, (dc in next dc, dc in next ch 1 space) around, ss to join. (60 dc)
Shell round: Ch1, sc in first dc, (skip next dc, 5 dc in next dc, sk next dc, sc in next dc) to last 3 dc, skip next dc, 5 dc in next dc, skip last dc, ss to first sc to join.
Finishing: Weave ribbon in and out of row 9 (11). Tie in bow.
Let me know what you think!!
Please be respectful and do not sell my pattern or claim it as your own. Happy crocheting and give credit where credit is due. Thanks!
Thursday, May 26, 2011
Tunisian Crochet Iris Purse
My mentor and friend is retiring this year. Congratulations to her! I have been trying to figure out what I could get for her that wasn't a gift card. I also didn't want to make something that she could make for herself. She is also a crocheter, though maybe not as neurotic as I am about it. I thought of a scarf, but it is finally getting warm here in Montana. Then I thought of a light summer shawl. I would love to lovingly work on some beautiful lace for her. But she doesn't really seem like the lace shawl type (kind of like me). So I finally settled on a bag. I have recently been playing around with messenger type bags and tunisian crochet and different designs. I thought too that now that she doesn't have to carry a laptop bag and testing kits and whatever else around with her all the time (suffice it to say that we work in education), maybe she would like to carry just a cute little bag that might hold a good book or her most recent project.
I don't know what her favorite flower is but I love irises so that was a selfish design design decision but I don't think she will mind. The yellow inner part of the iris is done in a chenille yarn so it is kind of fuzzy just like the real thing.
I also found some inexpensive sturdy nylon (or maybe I should say "cheap" as it was a $0.39 remnant) to line it with. My sewing machine won't handle the crocheted material so it is handsewn to the inside.
I twisted the handle before attaching it to the second side because it limits the stretch when carrying heavier items. I actually really like the finished product. Maybe someday I will make one for me!
Wednesday, May 25, 2011
Hats, Hats, and more Hats!
Okay, so my most recent obsession is baby hats. They are quick and fun and I love changing up the details a little. Here are thre of my most recent. I love the one with the little point on top. It reminds me of a Hershey's kiss. The yarn is absolutely yummy too, rainbow and soft. I love how it goes from yellow to pink to purple to blue to yellow, again. Machine washable too! You can't beat that. They are all listed in my Etsy shop as of now: Alison Grace
Monday, May 2, 2011
Vintage Family Heirloom Repair
A couple of weeks or so ago a co-worker asked me to take a look at a bedspread made for her parents when they got married 65 years ago. I was of course intrigued. I love to see true vintage items and family heirlooms. Well this thing is gorgeous. It is done in a really fine crochet thread in spiral motifs then stitched together. And it fits a queen-size bed. Holy Cow, the work that went into it!
So here was her ulterior motive, some of the motifs are falling apart and separating and the blanket has some rather large holes in it. She is a knitter, not a crocheter, and was hoping that maybe I would be willing to work on it. I very quickly agreed - it would be a pleasure.
After I took it home I got to looking at it more closely. It is obviously very old. I had some fears that I would not be able to match the thread used. In fact, I did have some trouble with that but found some that would work. It is about the same color but has more of a sheen to it. It also has more plies to it so hopefully will be stronger than the original.
So, now I have been working on it for several hours. I thought I might put 10-12 hours into it but most likely it will be double that. I thought at first that I may have to remove the border and disassemble the whole thing. I don't think that is the case now, which is good. I am doing my best to jump in wherever the extra thread is needed and replace the original stitches. I'm hoping it will be stronger than before. I will attach pictures as I go along.
Thursday, April 14, 2011
Yay Store is Open!!
I finally got my new store "Alison Grace" http://www.etsy.com/shop/AlisonGrace?ref=pr_shop open on etsy. I have a new banner, items for sale, and there is a free shipping sale until the end of April!! Check it out! Much of the stock are things that have been shown here in the last few weeks. I also am looking forward to special orders. I would also like to start selling my original patterns. Hopefully I get some positive feedback. My self-esteem has taken a huge hit this week and I am still recovering. The good news is that I may get to finally move back home. Every cloud has a silver lining, I guess, or at least that's what I'm trying to tell myself.
Saturday, April 9, 2011
Beep Beep Sweater
I think this sweater turned out pretty cute. I ended up frogging it several times to get the intarsia cars right but it worked out in the end. I really like the "Beep Beep" on the sleeve. A friend of mine, Cathy, recommended that I make car buttons in red, yellow, and green so I did. I love polymer clay for making my own buttons. I hate button shopping. I can never get what a want and they are always the wrong size. Then when I find something I like, they either come in a package of 500 or they are $5 a button. Crazy!
Anyway this little sweater took me about a week. I sort of started on one pattern then changed my mind and made up the rest myself. The pattern actually started as a little girl's dress! I like it better this way. Tell me what you think!
Thursday, April 7, 2011
Ladybug Top
This is another variation on the yellow sun top. The ladybugs on the front are pockets. I want to make another one later this month that is longer for my niece to wear as a sundress. Here is modeled by the ever-adorable Lily.
I hope to get my store up and running on Etsy.com this weekend. The grand opening of Alison Grace! The store will offer beautiful and unique baby clothing, blankets, and toys.
Tuesday, March 29, 2011
Crocheted Bolero
Yarn: Bernat Ping Pong Gauge: 8 sts x 6 rows in dc = 4” x 4”
Hook: K
Hook: K
Ch 37
Row 1: dc in 4th chain from hook (counts as first dc), dc in next 4 ch, *3 dc in next chain (corner made), dc in next 5 ch, 3 dc in next ch (corner made),* dc in next 10 ch, repeat from * to * once, dc in next 5 ch, turn.
Row 2: ch 3, dc in next 5 dc, *3 dc in next dc, dc in next 6 dc, 3 dc in next dc,* dc in next 12 dc, repeat from * to * once, dc in next 6 dc, turn.
Rows 3-4: Continue as established, dc in each dc except 3 dc in each corner dc.
Row 5: ch 3, dc in next 8 dc, ch 5, skip next 9 dc, dc in next 18 dc, ch 5, skip next 9 dc, dc in next 9 dc, turn.
Row 6: ch 3, dc in next 8 dc, dc in next 5 ch, dc in next 18 dc, dc in next 5 ch, dc in next 9 dc.
Trim:
Working in end of rows, ch 4, 6 tr in end of row, (sc in next row, 5 tr in next row) twice, sc in next row, working in beginning chain, skip first ch, (5 tr in next ch, sk next ch, sc in next ch, skip next ch) across neckline, continue pattern (5 tr, sc) in end of rows working 7 tr in corner, skip next dc, sc in next dc, (skip next dc, 5 tr in next dc, skip next dc, sc in next dc) to next corner, join to first chain 4. Finish off
Sleeves are worked in a 2-row spiral without joining between rows:
Round 1: Join yarn with sc in middle dc of 3-dc group in corner of armhole. Dc in each dc to first dc of 3-dc group, sc in next dc, end of next row, and in 5 ch, sc in next end of row,
Round 2: 3 dc in next first sc, (sc in next dc, 3 dc in next dc) around shoulder, sc in next sc and in each sc to end of round, slip stitch to first dc.
Repeat for other sleeve.
Wednesday, March 23, 2011
Crocheted Baby Sun Top
Yarn: A - Bernat Baby Soft Yellow B – Bernat Baby Soft Purple
Gauge: 15 sts x 8 rows in dc = 4” x 4”
With color A: Ch 59
Row 2: ss in 1st and 2nd dc, ch 3, dc in next 8 dc, *3 dc in next dc, dc in next 10 dc, 3 dc in next dc,* dc in next 18 dc, repeat from * to * once, dc in next 9 dc, turn.
Rows 3-5: Continue as established, dc in each dc except 3 dc in each corner dc.
Join on 5th row.
Round 6: ch 3, dc in next 14 dc, ch 8, skip next 19 dc, dc in next 28 dc, ch 8, skip next 19 dc, dc in next 14 dc, join.
Round 7: ss in first 3 dc, ch 5, (tr in next dc, ch 1) twice, tr in same dc, ch 1 (tr in next dc, ch 1) twice, *dc7tog over next 7 dc, ch 1, (tr in next dc, ch 1) twice, repeat from * around ending with dc7tog over last 7 dc (including ss), join to 4th chain of 1st chain 5.
Rounds 9-15: Repeat rounds 7 and 8 3 more times, then round 7 once more. Finish off.
Trim bottom:
Trim sleeves:
Repeat for other sleeve.
Gauge: 15 sts x 8 rows in dc = 4” x 4”
Hook: G
size 3-6 months
Notes:
Rows 1-4 are worked back and forth, turning at the end of each row. This allows for a button to be placed in the back. Rounds 5 on are worked in the round. So at the end of row 5, you would join to the beginning of row 5 with a slip stitch.
size 3-6 months
Notes:
Rows 1-4 are worked back and forth, turning at the end of each row. This allows for a button to be placed in the back. Rounds 5 on are worked in the round. So at the end of row 5, you would join to the beginning of row 5 with a slip stitch.
With color A: Ch 59
Row 1: dc in 8th chain from hook (button hole made), dc in next 7 ch, *3 dc in next chain (corner made), dc in next 8 ch, 3 dc in next ch (corner made),* dc in next 16 ch, repeat from * to * once, dc in next 8 ch, turn.
Row 2: ss in 1st and 2nd dc, ch 3, dc in next 8 dc, *3 dc in next dc, dc in next 10 dc, 3 dc in next dc,* dc in next 18 dc, repeat from * to * once, dc in next 9 dc, turn.
Rows 3-5: Continue as established, dc in each dc except 3 dc in each corner dc.
Join on 5th row.
Round 6: ch 3, dc in next 14 dc, ch 8, skip next 19 dc, dc in next 28 dc, ch 8, skip next 19 dc, dc in next 14 dc, join.
Round 7: ss in first 3 dc, ch 5, (tr in next dc, ch 1) twice, tr in same dc, ch 1 (tr in next dc, ch 1) twice, *dc7tog over next 7 dc, ch 1, (tr in next dc, ch 1) twice, repeat from * around ending with dc7tog over last 7 dc (including ss), join to 4th chain of 1st chain 5.
Round 8: ch 2 *(dc in next ch 1 sp and next tr) 5 times, dc in next tr, dc2tog inserting hook in next 2 ch sps (skipping top of group), repeat from * around, join to top of 1st ch.
Trim bottom:
Attach color B with a single crochet on top of a dc7tog, *(ch 3, sc in next ch 1 sp) 5 times, ch 3, sc in top of next dc7tog, repeat from * around, end with ss in first sc. Finish off
Trim sleeves:
Attach color B with sc in side of row 6, ch 3, *skip next dc, sc in next dc, ch 3, repeat from * across shoulder, end with sc in side of row 6 on other side.
Embroider flowers on front.
Ribbon detail: with color B, chain long enough to go from one side to other. Weave in and out of every two dc. Knot at each side and weave in ends.
Saturday, March 19, 2011
My First Pattern! Happy Flowers Sweater!
This is my first pattern published in any way! Hope someone likes it! Now on Ravelry.com!
Yarn: 1 6oz skein Yarn Bee Snowflake Wool Blend
Needles: size 5, 16-inch circular
Hook: F and G
Gauge: 20 sts x 28 rows = 4” x 4”
Cast on 104 stitches. Working in round, work in 4x4 ribbing for 6 rows. Continue in stockinette stitch for 6 ½ inches.
Arm hole shaping: Bind off 12 sts, knit 40 sts, Bind off 12 sts
Work front and back separately.
Front:
Work in stockinette stitch for 16 rows. Move middle 28 sts to waste yarn or stitch holder. Work 6 sts on each side in stockinette stitch for 10 rows. Bind off
Back:
Work in stockinette st for 19 rows. Move middle 28 sts to stitch holder. Work 6 sts on each side in stockinette st. for 10 rows. Bind off.
Sew shoulder seams.
Neck:
Knit 28 sts off holder, pick up 8 stitches along the side of the neck, knit the back 28 stitches off the holder, pick up 8 stitches along the other side of the neck.
For next three rows, k2, p2 around. Bind off.
Sleeves:
Round 1: With G Hook, single crochet 33 evenly around arm hole.
Round 2: Ch 6, (skip 2 sc, dc in next sc, ch 3) 10 times, slip stitch to ch 3 of first ch 6.
Round 3: Ch 5, sc in 1st ch 3 space, ch 2 (dc in next dc, ch 2, sc in next ch 3, ch 2) around. Join with ss.
Repeat rows 2 and 3 twice more. Change to F hook. Repeat rows 2 and 3, 3 more times. Finish off.
Repeat for other sleeve.
Embroider flowers on front as in picture.
Happy Flower Sweater size 24 months
Yarn: 1 6oz skein Yarn Bee Snowflake Wool Blend
Needles: size 5, 16-inch circular
Hook: F and G
Gauge: 20 sts x 28 rows = 4” x 4”
Cast on 104 stitches. Working in round, work in 4x4 ribbing for 6 rows. Continue in stockinette stitch for 6 ½ inches.
Arm hole shaping: Bind off 12 sts, knit 40 sts, Bind off 12 sts
Work front and back separately.
Front:
Work in stockinette stitch for 16 rows. Move middle 28 sts to waste yarn or stitch holder. Work 6 sts on each side in stockinette stitch for 10 rows. Bind off
Back:
Work in stockinette st for 19 rows. Move middle 28 sts to stitch holder. Work 6 sts on each side in stockinette st. for 10 rows. Bind off.
Sew shoulder seams.
Neck:
Knit 28 sts off holder, pick up 8 stitches along the side of the neck, knit the back 28 stitches off the holder, pick up 8 stitches along the other side of the neck.
For next three rows, k2, p2 around. Bind off.
Sleeves:
Round 1: With G Hook, single crochet 33 evenly around arm hole.
Round 2: Ch 6, (skip 2 sc, dc in next sc, ch 3) 10 times, slip stitch to ch 3 of first ch 6.
Round 3: Ch 5, sc in 1st ch 3 space, ch 2 (dc in next dc, ch 2, sc in next ch 3, ch 2) around. Join with ss.
Repeat rows 2 and 3 twice more. Change to F hook. Repeat rows 2 and 3, 3 more times. Finish off.
Repeat for other sleeve.
Embroider flowers on front as in picture.
Saturday, March 12, 2011
Felted Kindle cover!
Yay! I got myself a Kindle!! Now I just need to get motivated to read all my actual physical books before I can start buying books on Kindle. It's a little hard to see in the pictures but the front has a celtic cable. Then it's felted, cut to size, and has a zipper. I also have the Kindle attached inside with a clear elastic. I wanted to make more than a slip cover that the Kindle would go in and out of. I wanted the Kindle to stay in the case.
Friday, March 11, 2011
Yay a Finished Sweater!
This pattern is from the most recent Interweave Knits. I bought this yarn months ago and figured I would find the right pattern later. I knew it the minute I saw it. I'm still working a little on trying to get the front to hang just right but I think it was a success. Lots of compliments at work today and I love the colors. The little bit of sparkle makes it even better. Also, it's really soft, the mohair creates kind of a halo-effect around the yarn!
The best part is the pattern is really, really easy. Basically it is two rectangles. The front one is longer and twisted once. Then stitches are picked up and sleeves added.
Sunday, February 20, 2011
All you think about is Sox, Sox, Sox...
Well, that's not true. I think about lots of things. Like sweaters, hand warmers, scarves, just how many elephants my upstaires neighbor has living with him now.
Anyway, back to socks. I finished them! Aren't they lovely?! I love making socks because it's the only time I get to wear socks that actually fit. You may have noticed that when you buy socks, they come in a size range. For Example 6-9. Maybe this works for people who wear size 9, but for those of us on the lower end, it means we end up wearing the heel up on our ankle. I have, in the past, bought boys' socks to combat this problem. They are quite narrow most of the time and I find I am not happy with them either.
I think it stems back to my freshman year of high school. I was wearing my favorite Harvard sweatshirt (a lovely burgundy color) and a pair of mustard colored socks. Now my reasoning in my head for this bizarre combination was that 1) the socks matched the lettering on the shirt, and 2) no one really notices that sort of thing anyway. Well, my fragile world came crashing down the day after school when walking by the "Sugar Shack" some.....girl (trying to decide the right word here) called out "Your socks don't match your shirt!" Needless to say, I was deeply traumatized by the whole incident and immediately tossed out those socks when I got home.
Now that I am older and hopefully wiser, I don't let such things get to me. I like to wear fun socks, especially if they are handmade and fit perfectly. Someone asked me what I will do when they wear out. I thought, Yay! I'll get to make another pair. Please don't let you socks become family heirlooms or something. They were meant to be treasured by your feet! All you who have worn handmade socks will understand that!
Anyway, back to socks. I finished them! Aren't they lovely?! I love making socks because it's the only time I get to wear socks that actually fit. You may have noticed that when you buy socks, they come in a size range. For Example 6-9. Maybe this works for people who wear size 9, but for those of us on the lower end, it means we end up wearing the heel up on our ankle. I have, in the past, bought boys' socks to combat this problem. They are quite narrow most of the time and I find I am not happy with them either.
Let's talk about color now. If you swear by white socks...Hallelujay, inexpensive, multi-sock packs are for you. If you want something a little darker or professional, it is possible to get trouser socks for a slightly less reasonable price. If you would like something fun, with some great colors, that don't have hearts, or reindeer, or shamrocks on them, good luck. They only time fun socks are really available is during holiday season. Now I do have a friend (and a mother, for that matter) that will continue to wear these socks long after the holiday has passed, but I am not one of those brave souls.
Now that I am older and hopefully wiser, I don't let such things get to me. I like to wear fun socks, especially if they are handmade and fit perfectly. Someone asked me what I will do when they wear out. I thought, Yay! I'll get to make another pair. Please don't let you socks become family heirlooms or something. They were meant to be treasured by your feet! All you who have worn handmade socks will understand that!
Sunday, February 6, 2011
2-at-a-time Toe-up socks!
Working on my first pair of 2-at-a-time Toe-up sox! Love the color, love the pattern! So far pretty slow but I have to admit, it will be really nice to have a pair of sox when I am done and not a half a pair. I refuse to succumb to the dreaded "SSS" (second sox syndrome!)
My new favorite sweater
Crocheted in concentric circles starting at the elbow. The original pattern from Lionbrand.com was for a pullover. I modified the pattern to be a cardigan. I didn't even out the front edges and only seamed the back. I also added a plain trim to make it more finished looking. The closure is an old pin I happened to have laying around that matched perfectly! The best part is the yummy soft yarn - Sensations by Joann.
Subscribe to:
Posts (Atom)